This post discusses various additions in your website configuration that help protect your visitors from various forms of attack. While not really a requirement for most personal sites such as this, hopefully the discussion below will be of help to people in charge of more sensitive sites.
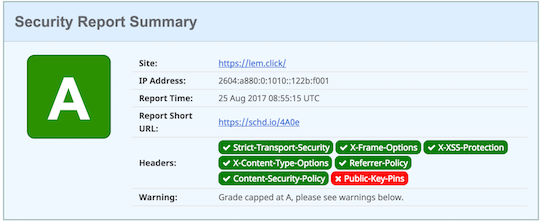
Sample scorecard for my website
The state of the art in security changes very fast and requires constant adaptation to stay one step ahead of the bad guys. Recent events have prompted me to write this piece, as these techniques are helpful to safeguard users’ access to sensitive websites.
HTTP/1.1 200 OK
Date: Fri, 25 Aug 2017 06:56:52 GMT
Content-Type: text/html; charset=UTF-8
Transfer-Encoding: chunked
Connection: keep-alive
Access-Control-Allow-Origin: *
Cache-Control: public, max-age=900, no-cache="set-cookie"
Expires: Fri, 25 Aug 2017 06:58:55 GMT
Pragma: public
Vary: Accept-Encoding,X-Device-Type
⋮
These headers are probably similar to the ones that your website sends to its visitors. And that is perfectly fine for most websites. But what if you’re in charge of a more sensitive website? Say, a financial institution or a news site that doesn’t yield to political pressure?
In that case, I would probably want to make all I can to ensure that my visitors can’t be fooled into connecting to a rogue server – we call those a “Man-in-the-middle attack” – or that the content can’t be hijacked and wrapped by a hostile frame that would steal the information provided by my users.
I’ll go over a few techniques that are available to website administrators through easy configuration changes. While the examples I provide are for Nginx, these are easy enough in other web servers.
Strict Transport Security — HSTS
HSTS consists of a header that tells the browser that this website should be accessed via HTTPS only. The browser will remember this for a time period that is sent along int he HSTS header, and it will automatically transform all insecure references (i.e., links using the http:// scheme) to secure references using https://. Also, while the HSTS policy is in effect, any SSL failures will immediately interrupt the connection.
I added the following line to each TLS site { ⋯ } in my nginx configuration, as follows. This is important because the HSTS header is only honored when provided through a TLS session.
site {
	⋮
	add_header Strict-Transport-Security "max-age=31536000; includeSubDomains" always;
	⋮
}
The above informs visitors’ browsers that the site should only be visited using https:// and that the policy is valid for one year. It also extends to any subdomains.
Content Security Policy — CSP
This feature allows your webserver to provide the browser with a policy that specifies where content can come from. This is particularly important if your website accepts input from external sources — think about a comment section where someone finds a way to inject Javascript or HTML code.
Using the Content-Security-Policy (and Content-Security-Policy-Report-Only for testing) you can limit the possible sources of loadable resources that the browser will execute, reducing the opportunity for a malicious user to poison your site.
I tend to use the -Report-Only variant of the header to elicit a warning on the console of my browser. You can also supply a special submission URL so that the browser reports policy violations automatically. Mozilla has a nice discussion about this header and its applications.
This is an example taken from this website’s configuration:
Content-Security-Policy: script-src self 'sha256-fVfRU1woWUD12uhXAhYI73ona1cVGhJWqSO9D20+LlU=' 'sha256-Z1VkycGIawI8bYFKUZpg3monWgL7d3dSlsNJKKYrqXE=' 'sha256-yqNB+7rHjONkl86+BkVlpgzz+28uLpHCm1Qee+GnbX0=' 'sha256-nP0EI9B9ad8IoFUti2q7EQBabcE5MS5v0nkvRfUbYnM=' https://lem.click:443 https://*.lem.click:443 https://*.jquery.com:443 https://cdnjs.cloudflare.com:443 https://connect.facebook.net:443 https://*.google-analytics.com:443 https://*.facebook.com:443 https://*.googleapis.com:443 https://*.bootstrapcdn.com:443 https://*.gstatic.com:443 https://*.google.com:443 https://cdn.jsdelivr.net:443; default-src self unsafe-inline https://lem.click:443 https://*.lem.click:443 https://*.jquery.com:443 https://cdnjs.cloudflare.com:443 https://connect.facebook.net:443 https://*.google-analytics.com:443 https://*.facebook.com:443 https://*.googleapis.com:443 https://*.bootstrapcdn.com:443 https://*.gstatic.com:443 https://*.google.com:443 https://cdn.jsdelivr.net:443 data: 'sha256-0FUounkB/AX7IE41uekBCBDpcxZsQPkiAEDbwQwT/rk='
Notice how I’ve listed the sources I trust for content as well as specific inline resources I have on my pages. This was identified using the Google Developer Tools available from within Chrome, tweaking the header until all known resources were properly authorized.
Over time it’s possible that signatures change or new sources pop up, so make sure to check your site for unauthorized resources from time to time, to keep the user experience from deteriorating.
Framing protection
Placing your content inside a frame is a very simple class of attack that can be used to capture browser events such as password entry or clicks. Protecting from this is as simple as adding this header to your configuration:
site {
	⋮
	add_header X-Frame-Options "SAMEORIGIN" always;
	⋮
}
XSS and Drive-by downloads
These are interesting attacks that can be exploited in a variety of ways.
In Cross Site Scripting attacks, a carefully crafted hyperlink is presented to the victim. The classic example involves presenting the victim a carefully crafted hyperlink leading to the “request money transfer” page of the victim’s bank.
Accessing that function would typically require authentication, but if the malicious link is clicked while the user is logged in to his bank, the request would be processed.
Drive by downloads is the placement of unwanted files – typically malware – under an inocuous looking URL. When the victim clicks on the link, the browser will attempt to be helpful by examining the first chunk of the file, trying to determing what kind of file this is and processing it accordingly.
To mitigate both risks, I usually add these directives to my configuration:
site {
	⋮
	add_header X-XSS-Protection          "1; mode=block" always;
	add_header X-Content-Type-Options    "nosniff"       always;
	⋮
}
Referrer
You should know that when browsers follow hyperlinks, they send the URL where they come from – this is what we call Referrer and it’s very useful to identify sites that drive traffic to you.
The referer can be viewed as a digital breadcrumb path, where at each step the browser tells where it comes from. Visiting a dissident website and then requesting content from a pro-government website could very well leak information about your political stance.
However, for most cases, I recommend leaking only partial information: The website URL without the path. This would mean that the referrer for links originating on this page would be https://lem.click but not the complete URL pointing to this very post.
This is what I placed on my nginx configuration file to achieve this:
site {
	⋮
	add_header it-Policy           "origin" always;
	⋮
}
HTTP Public Key Pinning vs DANE
A hard to defeat attack involves a well-placed adversary blocking traffic to port 443, hence preventing regular https:// URLs from working. This can be done via simple packet filters or with more sophisticated packet inspection that would detect the TLS traffic and block it.
Another plausible scenario would involve an attacker luring its victims to connect to a malicious proxy that would then connect to the real site using https://. Information between the client and the real server would be visible to the malicious proxy and the browser would be unable to defend in this scenario regardless of how many green padlocks show up in your address bar.
I have to confess that I’m a bit torn about what the best defense is here. HPKP provides mitigation for this attack that lives entirely within HTTP and works by telling first-time browsers which public keys would be acceptable for accessing this website. This is relatively simple, but only protects repeat visitors.
People accessing your site for the very first time would be unprotected because their browser wouldn’t know which certificates to expect.
DANE achieves a similar goal, but the information is placed in the DNS where it’s protected with DNSSEC. The advantage on this case would be that even on first access, the browser would know that the website should be encrypted and that the certificate could be validated.
At the time of this writing, support for both – HPKP and DANE/TLSA – is far from widespread. TLSA is only beneficial for the combination of sites implementing DNSSEC and clients using a validating resolver.
There are other pros and cons for both options, which I intend to explore in a future post. For the time being, what do you think? Which one is the best? Let me know via twitter.
And please share, 👍 and promote this post if you liked it.