Vibration can affect your multirotor drone in many ways, some of them non-obvious. In this post I’ll try to explain some of them along with strategies to minimize its effects.
There are many sources that describe the sources of the vibration. Personally I think this is a no-brainer. You have a bunch of propellers turning very fast. That’s your source.
Reducing Vibration in the First Place
This seems rather obvious, but is something to consider. Vibration can easily come from an unbalanced motor bell, from a bent prop adapter, from an unbalanced, chipped or cracked propeller, cracked motor base… you get the idea. Anything that moves can create vibration.
This is why it’s so important to do your pre-flight checks thoroughly. Make sure the motors are firm and that propellers are in good shape. A seldom considered source of lower frequency vibration is aerodynamic in nature: A bent or deformed propeller will vibrate more – and in the process, increase material fatigue and convert your nice flight into a recovery excursion.
Make sure your propellers are nice and tight, that there are no loose screws, that cables are secure. Also make sure that there are no visible dents or impacts in any moving parts. This is all part of your pre-flight and I can’t overstate its importance.
We’re after a very elusive goal: We want the frame to be rigid and transmit all movement to the flight controller, but we want to leave off harmful vibration. Hang on for the why.
It’s A Little Vibration, What Could Go Wrong?
Many things! Vibration is not your friend. Here are some of the things that can go wrong…
Parts Coming Loose
You did use blue Loctite® 242 in your mounting screws, didn’t you? A little well applied Loctite® will prevent nuts from coming loose under moderate vibration. It does not hurt to use Nyloc or locking nuts for the same reasons.
The thing is, if you have a strong enough vibration source in your drone, parts will start coming loose and this compromises airframe integrity. Make sure you use Loctite®, tighten nuts and bolts and regularly readjust them as they get loose. Personally, I do light check after each session and a thorough review every 10 hours.
Your Electronics are More Likely to Fail
Connectors love to get loose under vibration. You don’t need them to completely separate to have a serious failure – just a momentary interruption in your power connector is enough to reset your flight controller. Same thing with your ESCs.
Vibration also causes stress in soldered joints and paths, which can crack more easily leading to severe problems. This is why proper strain relief in your cables is important: You don’t want cables that are tight pulling on their connectors.
Also keep in mind that to the accelerometers in your flight controller, these vibrations can be very confusing. You see, at these frequencies vibration from various sources can compound into larger waves which can make the flight controller think that the drone is tilting, urging it to issue a correction.
These corrections happening many times per second can easily cause unstable flight or make your drone hard to control. This is easy to spot when triggering the auto-stabilization mode. The drone will exhibit jerky movements. Adjusting the PIDs is something that should be done after addressing the underlying vibration problem.
Poor Video Quality
This is perhaps the best known effect of vibration. The jello effect is caused by the interaction between the mechanical vibration and the frame capture of CMOS cameras. But CCD cameras are not immune to vibration either, as they can also lose their ability to focus.
Changing the frame rate, specially increasing it can help sometimes at the cost of reduced resolution, image quality and storage space.
Zone Your Drone
A strategy to deal with vibration is to assume that it will come from the motors and then work in areas. In some models you can mount the motors with rubber washers, which will absorb a bit of vibration.
Then you can have a second and a third line of defense using various materials to counteract the vibration and gradually reduce it to manageable levels.

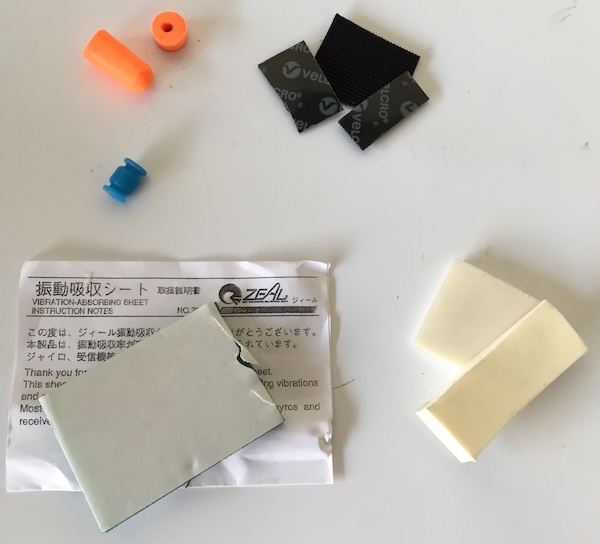
Various vibration absorbing materials I've used
In the image above you can see the materials I’ve used in the past. Note that you’ll have to experiment, as each material excels in a particular frequency / amplitude range. There’s no silver bullet.
For instance, the humble ear plugs in the top left are cheap and can easily be made into thick washers. They do help – my electronics mounts love them – but they work best when combined with the magic anti-vibration gel in the bottom left, a more expensive solution.
Right between them you can see a rubber ball – these are used to isolate two areas and provide excellent vibration dampening. These are my favorite option, when I can mount them.
To the right you have plain old Velcro® tape, which in some cases will help. Below it, some Latex® foam which in my case, only works in certain cases.
I’ve also seen people use cardboard and other packaging materials with success. In the end, you need to experiment and determine what works best for your drone. Get yourself a few options and don’t be afraid to experiment.